Build Adobe Analytics Segments Using R - adobeanalyticsr v0.3.0
Adobe Analytics has built a great UI for building segments which lowers the entry point for analysts to have the ability to create meaningful segments quickly. The segment builder user interface (UI) contains drag and drop functionality that encourages a better understanding of what makes a basic and complex segments.
Since all good data analysis includes a repeatable process, it is important to have a way to code segments into your analysis workflow. The new set of segment building functions in the newest version of adobeanalyticsr enables that very thing.
Thankfully, everything the UI does is built on “Adobe Analytics API v2.0”. The goal of this article is to show a basic example to help get get you started.
Let’s get going!
If needed, install the package. The latest version (v0.3.0) includes the segment building functionality I am presenting here.
#install.packages('adobeanalyticsr')Once the package is installed in your library it is essential to load the package into your working session by using the library() function.
library(adobeanalyticsr)The Adobe Analytics API v2.0 has two ways to authenticate and adobeanalyticsr supports both. Make sure to check out the aw_auth() function (?aw_auth) for more information on which is the best for you. In this case I’m using the JWT authentication. This simply means I’ve downloaded the service account JSON file and the private.key file from my project in the developer.adobe.io console and referenced the file path in the .Renviron using the two variables, AW_AUTH_FILE and AW_PRIVATE_KEY.
# Authenticate
aw_auth('jwt')
## Successfully authenticated with JWT: access token valid until 2022-03-03 10:47:05Next, I will need to define the report suite that I am going to be using as the validation for our new segment. While segments can be used in multiple report suites across your Adobe Analytics account, it is important to use the appropriate base report suite for validation purposes. (Note: You do have to have access to this report suite via your authentication.)
rsid <- 'ageo1xxpnwsdi2020prod'Building segments in Adobe Analytics consists of 2 main elements Rules and Containers. Grasping these 2 basic concepts will go a long way in the ability to integrate segment building into your analysis workflow.
Define the Rule(s)
Rules are made up of 3 main elements: subject (dimension/metric), verb, and object.

Rule
Subject
The subject is what is main part of the rule. It has to be defined as either a “metric” or a “dimension”. You can identify the metrics by downloading them using the aw_get_metrics() function and dimensions can be downloaded by using the aw_get_dimensions() function.
Verbs
Every rule includes a linking verb which relates the object back to the subject. There are 32 verb options in the segment documentation but number list verbs are a little unclear so there are 2 additional verbs listed as options in the package data documentation (?seg_verbs).
DT::datatable(seg_verbs,
              extensions = c('FixedColumns',"FixedHeader"),
              options = list(scrollX = F,
                             paging=T,
fixedHeader=T))Building the rule
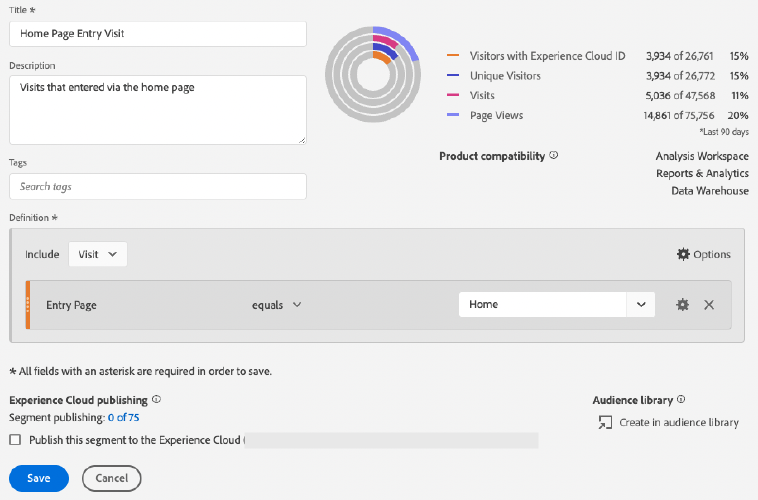
Each rule of a segment must be defined separately. This is similar to the way you build rules in the UI. The following example is a rule that says the dimension “page” must equal “Home” to be included into the segment.
rule1 <- seg_rule(dimension = 'page',
                  verb = 'streq',
                  object = 'Home')
The rule1 object is a list item that will be turned turned a JSON string to be used in the API call to build or validate the function.
## {
##   "func": "streq",
##   "str": "Home",
##   "val": {
##     "func": "attr",
##     "name": "variables/page"
##   }
## }
In this example I want to add another rule to help define the limitation of our segment. The next rule limits the visits to be on January 25, 2022.
rule2 <- seg_rule(dimension = 'daterangeday',
                  verb = 'eq',
                  object = '2022-01-25')
Finally, we want to add an additional rule to be used as an optional qualifier for visits to be included in this segment. For some reason we want to also include all visits that were on a mobile device. The rule says that the dimension “mobiledevicetype” value must ‘equal’ “Mobile Phone” to be included.
rule3 <- seg_rule(dimension = 'mobiledevicetype',
                  verb = 'eq',
                  object = 2163986270)
Note: There are some quirks to the API that I am still trying to figure out. One of these is represented in this example. While the UI is clearly a list of mobile device types such as “Mobile Phone”, the API is actually needing a number. That is why I am using the numeric “eq” verb with a dimension. I only include this example to point out the fact that this process of building segments using code is valuable but there is a learning curve. Most of the time you will not have any problems at all but there are some circumstances that may require you to do a bit of research to get it right using the API.
Create the Container
Every segment has at least one container. Adding an additional container to the main container is only needed if you are using a different “conjunction” between then. Here I am creating a “visit” context container using “rule1” and “rule2” and using the conjunction “and”. This will result in a segment that includes visits where both rules are true.
container1 <- seg_con(context = 'visits',
                      conjunction = 'and',
                      rules = list(rule1, rule2))
Build the Segment
Now that we have the rules and containers defined we need to build the segment using the seg_build() function. By default, this will return a JSON string that can then be validated using the seg_val() function but you are able to change the argument “create_seg” to TRUE and it will create the segment in the UI and return the segment id which can then be used in your other API calls.
In the following example the segment name is “Home Page visits” and the description is “All visits that include a page named ‘Home’”. I am using the “containers” argument because we have at least one container to be included in our segment. If we were just using rules then we would use the “rules” argument.
built <- seg_build(name = "Home Page visits",
                   description = "All visits that include a page named 'Home'",
                   containers = list(container1, rule3),
                   context = 'visits',
                   conjunction = "or",
                   create_seg = FALSE)
Since the argument create_seg() is set to FALSE, the response of the function is a json string. As you can see, segment definitions can become quite complex to debug but going through each step of the process can help you quickly identify any issues or areas you can improve on. But now you also have a clear understanding of the definition and can easily include this as part of your analysis documentation. This analysis artifact can then be used by your future self or the next analyst.
## {
##   "name": "Home Page visits",
##   "description": "All visits that include a page named 'Home'",
##   "definition": {
##     "func": "segment",
##     "version": [1, 0, 0],
##     "container": {
##       "func": "container",
##       "context": "visits",
##       "pred": {
##         "func": "or",
##         "preds": [
##           {
##             "func": "container",
##             "context": "visits",
##             "pred": {
##               "func": "and",
##               "preds": [
##                 {
##                   "func": "streq",
##                   "str": "Home",
##                   "val": {
##                     "func": "attr",
##                     "name": "variables/page"
##                   }
##                 },
##                 {
##                   "func": "eq",
##                   "val": {
##                     "func": "attr",
##                     "name": "variables/daterangeday"
##                   },
##                   "num": 1220025
##                 }
##               ]
##             },
##             "val": {}
##           },
##           {
##             "func": "eq",
##             "pred": {
##               "preds": {}
##             },
##             "num": 2163986270,
##             "val": {
##               "func": "attr",
##               "name": "variables/mobiledevicetype"
##             }
##           }
##         ]
##       }
##     }
##   },
##   "rsid": "ageo1xxpnwsdi2020prod"
## }
Finally, let’s make sure this segment will validate in the report suite. It is important to note that the validation function uses the segment validation endpoint which doesn’t confirm the segment definition is returning any results, it simply validates that the segment elements are able to be used in the way you have compiled them. For instance, if you were to use “mobiledevice” instead of “mobiledevicetype” then the result of seg_val(built) would return an error stating the dimension was not able to be found.
If the segment validates it should look like this:
seg_val(built)## [1] "The segment is valid."Conclusion
We have already been using this in our analysis and data science workflows and it has proven to be a big help. In one scenario, I had to create 13 different complex segments based on the defined segments we wanted to isolate in our analysis. After creating them all in R I presented the initial findings to the team who quickly noticed I was missing an exclusion rule that should have been included on all 13 different segments. Normally the process would have been a huge headache but thankfully, I had coded all the segments and adding one simple exclusion rule to each one was quick. In addition, I was able to move forward with more confidence in my segments because using code eliminates much of the errors that happend due to multiple touch points in generating an analysis.